In this blog post, we’ll explore a relatively hidden part of the Gameplay Ability System (GAS): the Target Data Filters.
Basic knowledge of Gameplay Abilities in Blueprint is advised.
Understanding of C++ in Unreal is required.
Targeting
The Gameplay Ability System provides useful helpers for targeting.
Usually, you would use the Wait Target Data Gameplay Task:
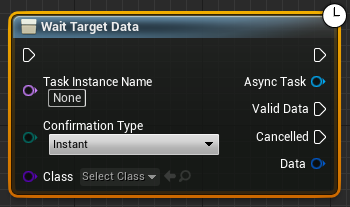
This task begins to be interesting once you select a Target Actor type, through the Class parameter. For instance, with the GameplayAbilityTargetActor_Radius we get these parameters:
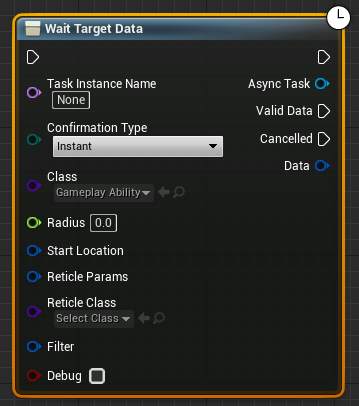
You can find more information on these parameters on the non-official documentation. However, the Filter parameter is deeper than it seems…
Basic Filtering
Using a filter for the targeting is pretty straightforward: we make a new GameplayTargetDataFilter, we pass the result to the MakeFilterHandle node, which can then be passed to the WaitTargetData task:
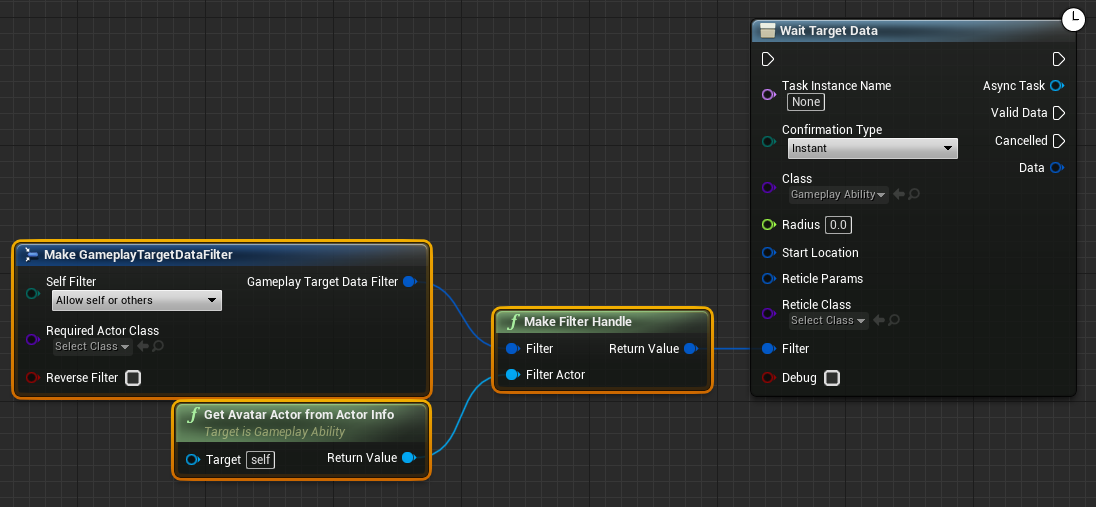
As you can see, we need to provide a “Filter Actor” which will serve as the basis for the filter comparison. It will most likely be the Avatar from the Ability, but it can be whichever actor depending on your use case.
With this, we can filter out some actors and/or require a specific class to target. While this is pretty useful, it is still quite limited.
Advanced filtering
Now, what if we want to filter our targeting based on other criteria? That’s where our C++ knowledge will come handy!
First, we need to subclass FGameplayTargetDataFilter (and add it a placeholder member, Name):
USTRUCT(BlueprintType)
struct FCustomTargetDataFilter : public FGameplayTargetDataFilter
{
	GENERATED_BODY()

	UPROPERTY(BlueprintReadWrite, EditAnywhere, meta = (ExposeOnSpawn = true), Category = Filter)
	FString Name;
};
Then we need to override the FilterPassesForActor function and provide its implementation:
USTRUCT(BlueprintType)
struct FCustomTargetDataFilter : public FGameplayTargetDataFilter
{
	GENERATED_BODY()

	UPROPERTY(BlueprintReadWrite, EditAnywhere, meta = (ExposeOnSpawn = true), Category = Filter)
	FString Name;

	/** Returns true if the actor passes the filter and will be targeted */
	virtual bool FilterPassesForActor(const AActor* ActorToBeFiltered) const override
	{
		if (const bool SuperValue = Super::FilterPassesForActor(ActorToBeFiltered))
		{
			const bool SpecificCondition = /* … */;
			return (bReverseFilter ^ SpecificCondition);
		}
		return false;
	}
};
If you’re curious about the (bReverseFilter ^ SpecificCondition) expression, reach the footnote 1!
Here we have the basics of a custom filter. However, we cannot use it in Blueprint just yet… Indeed, the Target Actor (through the WaitTargetData node) requires to be passed an FGameplayTargetDataFilterHandle, hence the Make Filter Handle node we’ve seen previously. But unfortunately, this node only accepts FGameplayTargetDataFilters so it can’t deal with the new FCustomTargetDataFilter…
We then have to create our own helper that will create the proper handle from our custom type. The easiest solution is to have a static function in a BlueprintFunctionLibrary:
/** Create a handle for filtering target data by name */
UFUNCTION(BlueprintPure, Category = "Filter")
static FGameplayTargetDataFilterHandle MakeCustomFilterHandle(FCustomTargetDataFilter Filter, AActor* FilterActor)
{
	FGameplayTargetDataFilter* NewFilter = new FCustomTargetDataFilter(Filter);
	NewFilter->InitializeFilterContext(FilterActor);

	FGameplayTargetDataFilterHandle FilterHandle;
	FilterHandle.Filter = TSharedPtr<FGameplayTargetDataFilter>(NewFilter);
	return FilterHandle;
}
Now we can use the Custom Filter in an Ability Blueprint!
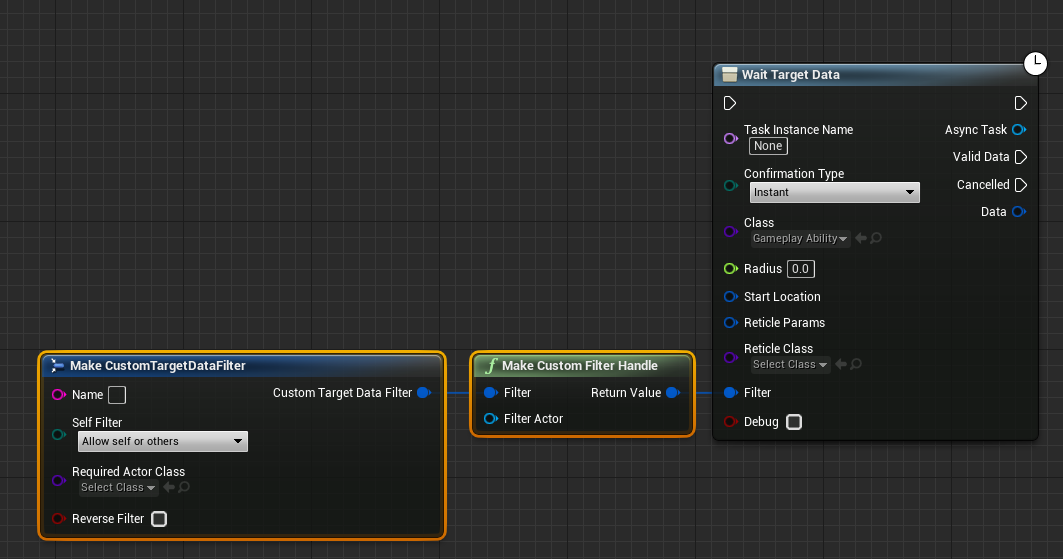
And you can see the placeholder parameter Name in the construction.
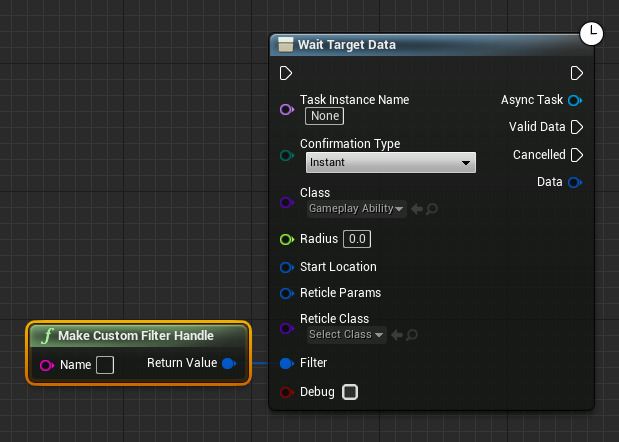
However, we may want to do something even more custom for our game. For instance, if we know the Filter Actor will always be the Avatar, that we don’t want to reverse the filter and we always want to exclude the self actor, then we will just create a new helper that will set all that by default and create the correct handle:
UFUNCTION(BlueprintPure, Category = "Filter")
static FGameplayTargetDataFilterHandle MakeCustomFilterHandle_Simple(const UGameplayAbility* Ability, const FString& Name)
{
	FCustomTargetDataFilter Filter;
	// set custom fields
	Filter.Name = Name;
	// set parent fields:
	// * allow only others, not self
	Filter.SelfFilter = ETargetDataFilterSelf::Type::TDFS_NoSelf;
	// * don't reverse the filter
	Filter.bReverseFilter = false;

	FGameplayTargetDataFilter* NewFilter = new FCustomTargetDataFilter(Filter);
	// set the avatar from the ability
	NewFilter->InitializeFilterContext(Ability->GetAvatarActorFromActorInfo());

	FGameplayTargetDataFilterHandle FilterHandle;
	FilterHandle.Filter = TSharedPtr<FGameplayTargetDataFilter>(NewFilter);
	return FilterHandle;
}
Now we can use it like this in our Ability Blueprint:
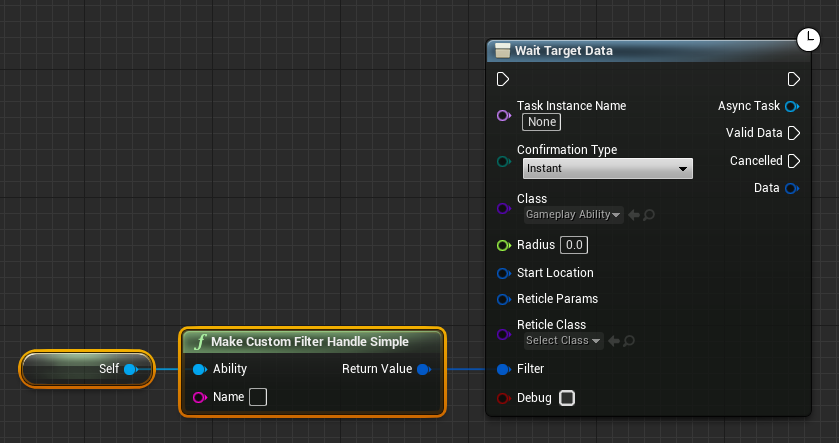
If we wanted to go slightly further, we could add the meta specifier DefaultToSelf:
UFUNCTION(BlueprintPure, Category = "Filter", meta = (DefaultToSelf = "Ability", HidePin = "Ability"))
static FGameplayTargetDataFilterHandle MakeCustomFilterHandle_Simple(const UGameplayAbility* Ability, const FString& Name);
It would remove the need to specify the Ability (by forcing it to use the self context of the node):
Now it’s pretty clean and very custom! :)
And that’s it for this tip! Hopefully, you enjoyed it and can start building efficient filters for your abilities!
-
(bReverseFilter ^ SpecificCondition) In this context,
bReverseFilteris a boolean member from the parent class andSpecificConditionis a local boolean variable. The^symbol is the bitwise XOR operator. If you are not familiar with it, take it as: if the conditions have the same values, then it’s false; if the conditions have different values, then it’s true. ↩